

Em um sábado de manhã eu estava tomando café da manhã e descobri o projeto face_recognition/reconhecimento facial. Comecei a brincar com o exemplo da opencv, coloquei minha foto e, uau! Ele funciona como um encanto. É bastante simples detectar o rosto e também posso obter os traços/marcos da face. Um dos traços é a ponta do nariz.
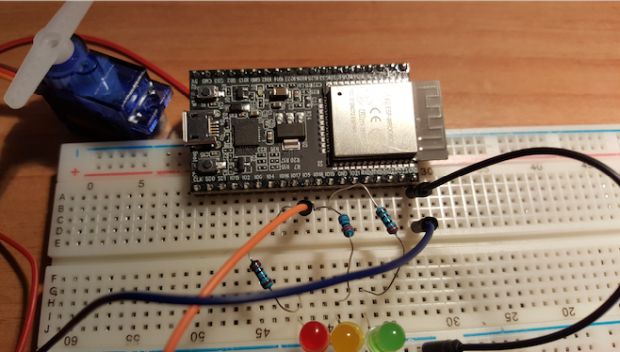
Brincando com esse roteiro, percebi que com a ponta do nariz posso determinar a posição do rosto. Posso ver se meu rosto está alinhado ao centro ou se eu o movo para um lado. Como eu tenho um novo dispositivo IoT (um ESP32), eu queria fazer algo com ele. Por exemplo, controlar um servo (SG90) e movê-lo da esquerda para a direita, dependendo da posição do meu rosto.
Primeiro temos o script Python principal. Com este script, eu detecto meu rosto, a ponta do nariz e a posição do meu rosto. Com esta posição vou emitir um evento para um corretor MQTT (um servidor mosquitto rodando no meu laptop).
import face_recognition
import cv2
import numpy as np
import math
import paho.mqtt.client as mqtt

video_capture = cv2.VideoCapture(0)

gonzalo_image = face_recognition.load_image_file("gonzalo.png")
gonzalo_face_encoding = face_recognition.face_encodings(gonzalo_image)[0]

known_face_encodings = [
    gonzalo_face_encoding
]
known_face_names = [
    "Gonzalo"
]

RED = (0, 0, 255)
GREEN = (0, 255, 0)
BLUE = (255, 0, 0)

face_locations = []
face_encodings = []
face_names = []
process_this_frame = True
status = ''
labelColor = GREEN

client = mqtt.Client()
client.connect("localhost", 1883, 60)

while True:
    ret, frame = video_capture.read()

    # Resize frame of video to 1/4 size for faster face recognition processing
    small_frame = cv2.resize(frame, (0, 0), fx=0.25, fy=0.25)

    # Convert the image from BGR color (which OpenCV uses) to RGB color (which face_recognition uses)
    rgb_small_frame = small_frame[:, :, ::-1]

    face_locations = face_recognition.face_locations(rgb_small_frame)
    face_encodings = face_recognition.face_encodings(rgb_small_frame, face_locations)
    face_landmarks_list = face_recognition.face_landmarks(rgb_small_frame, face_locations)

    face_names = []
    for face_encoding, face_landmarks in zip(face_encodings, face_landmarks_list):
        matches = face_recognition.compare_faces(known_face_encodings, face_encoding)
        name = "Unknown"

        if True in matches:
            first_match_index = matches.index(True)
            name = known_face_names[first_match_index]

            nose_tip = face_landmarks['nose_tip']
            maxLandmark = max(nose_tip)
            minLandmark = min(nose_tip)

            diff = math.fabs(maxLandmark[1] - minLandmark[1])
            if diff < 2:
                status = "center"
                labelColor = BLUE
                client.publish("/face/{}/center".format(name), "1")
            elif maxLandmark[1] > minLandmark[1]:
                status = ">>>>"
                labelColor = RED
                client.publish("/face/{}/left".format(name), "1")
            else:
                status = "<<<<"
                client.publish("/face/{}/right".format(name), "1")
                labelColor = RED

            shape = np.array(face_landmarks['nose_bridge'], np.int32)
            cv2.polylines(frame, [shape.reshape((-1, 1, 2)) * 4], True, (0, 255, 255))
            cv2.fillPoly(frame, [shape.reshape((-1, 1, 2)) * 4], GREEN)

        face_names.append("{} {}".format(name, status))

    for (top, right, bottom, left), name in zip(face_locations, face_names):
        # Scale back up face locations since the frame we detected in was scaled to 1/4 size
        top *= 4
        right *= 4
        bottom *= 4
        left *= 4

        if 'Unknown' not in name.split(' '):
            cv2.rectangle(frame, (left, top), (right, bottom), labelColor, 2)
            cv2.rectangle(frame, (left, bottom - 35), (right, bottom), labelColor, cv2.FILLED)
            cv2.putText(frame, name, (left + 6, bottom - 6), cv2.FONT_HERSHEY_DUPLEX, 1.0, (255, 255, 255), 1)
        else:
            cv2.rectangle(frame, (left, top), (right, bottom), BLUE, 2)

    cv2.imshow('Video', frame)

    if cv2.waitKey(1) & 0xFF == ord('q'):
        break

video_capture.release()
cv2.destroyAllWindows()
Agora, outro script Python estará escutando os eventos MQTT e disparará um evento com a posição do servo. Eu sei que este segundo script Python talvez seja desnecessário. Podemos mover sua lógica para o esp32 e para o script principal do opencv, mas eu estava jogando com o MQTT e queria dissociá-lo um pouco.
import paho.mqtt.client as mqtt

class Iot:
    _state = None
    _client = None
    _dict = {
        'left': 0,
        'center': 1,
        'right': 2
    }

    def __init__(self, client):
        self._client = client

    def emit(self, name, event):
        if event != self._state:
            self._state = event
            self._client.publish("/servo", self._dict[event])
            print("emit /servo envent with value {} - {}".format(self._dict[event], name))


def on_message(topic, iot):
    data = topic.split("/")
    name = data[2]
    action = data[3]
    iot.emit(name, action)


client = mqtt.Client()
iot = Iot(client)

client.on_connect = lambda self, mosq, obj, rc: self.subscribe("/face/#")
client.on_message = lambda client, userdata, msg: on_message(msg.topic, iot)

client.connect("localhost", 1883, 60)
client.loop_forever()
E finalmente, o ESP32. Ele vai se conectar ao meu wifi e ao meu corretor MQTT.
#include <WiFi.h>
#include <PubSubClient.h>

#define LED0 17
#define LED1 18
#define LED2 19
#define SERVO_PIN 5

// wifi configuration
const char* ssid = "my_ssid";
const char* password = "my_wifi_password";
// mqtt configuration
const char* server = "192.168.1.111"; // mqtt broker ip
const char* topic = "/servo";
const char* clientName = "com.gonzalo123.esp32";

int channel = 1;
int hz = 50;
int depth = 16;

WiFiClient wifiClient;
PubSubClient client(wifiClient);

void wifiConnect() {
  Serial.print("Connecting to ");
  Serial.println(ssid);

  WiFi.begin(ssid, password);

  while (WiFi.status() != WL_CONNECTED) {
    delay(500);
    Serial.print("*");
  }

  Serial.print("WiFi connected: ");
  Serial.println(WiFi.localIP());
}

void mqttReConnect() {
  while (!client.connected()) {
    Serial.print("Attempting MQTT connection...");
    if (client.connect(clientName)) {
      Serial.println("connected");
      client.subscribe(topic);
    } else {
      Serial.print("failed, rc=");
      Serial.print(client.state());
      Serial.println(" try again in 5 seconds");
      delay(5000);
    }
  }
}

void callback(char* topic, byte* payload, unsigned int length) {
  Serial.print("Message arrived [");
  Serial.print(topic);

  String data;
  for (int i = 0; i < length; i++) {
    data += (char)payload[i];
  }

  int value = data.toInt();
  cleanLeds();
  switch (value)  {
    case 0:
      ledcWrite(1, 3400);
      digitalWrite(LED0, HIGH);
      break;
    case 1:
      ledcWrite(1, 4900);
      digitalWrite(LED1, HIGH);
      break;
    case 2:
      ledcWrite(1, 6400);
      digitalWrite(LED2, HIGH);
      break;
  }
  Serial.print("] value:");
  Serial.println((int) value);
}

void cleanLeds() {
  digitalWrite(LED0, LOW);
  digitalWrite(LED1, LOW);
  digitalWrite(LED2, LOW);
}

void setup() {
  Serial.begin(115200);

  ledcSetup(channel, hz, depth);
  ledcAttachPin(SERVO_PIN, channel);

  pinMode(LED0, OUTPUT);
  pinMode(LED1, OUTPUT);
  pinMode(LED2, OUTPUT);
  cleanLeds();
  wifiConnect();
  client.setServer(server, 1883);
  client.setCallback(callback);

  delay(1500);
}

void loop()
{
  if (!client.connected()) {
    mqttReConnect();
  }

  client.loop();
  delay(100);
}
Vídeo com o protótipo funcional em ação:
O código-fonte está disponível na minha conta do GitHub.
***
Gonzalo Auyso faz parte do time de colunistas internacionais do iMasters. A tradução do artigo é feita pela Redação iMasters, com autorização do autor, e você pode acompanhar o artigo em inglês no link: https://gonzalo123.com/2018/04/09/opencv-and-esp32-experiment-moving-a-servo-with-my-face-alignment/

De 0 a 10, o quanto você recomendaria este artigo para um amigo?